DIY Rainbow Polka Dot Filters: Pot of Gold Not Included
61 305 Share TweetAdd some color and design to your photos with these easy-peasy, printable DIY Rainbow Polka Dot Filters. All the steps, tips, and tricks from someone who’s made it to the other side of the rainbow.

What you’ll need:
- Transparency Paper. They make these for either inkjet or laserjet printers. I only have a color laserjet, however I think these filters would work even better with an inkjet printer. Please get the paper that matches your printer type.
- Color printer. If you don’t have one, just go over to someone’s house that does! Note: You should probably ask beforehand.
- Photoshop. You don’t need photoshop, but this tutorial covers how to make the polka dots in Photoshop.
- Scissors. Tape. Cardboard. Some sweet tunes to work to.

First, I’ll go over making the Rainbow Polka Dot pattern.
If you’re not one to follow “the rules” feel free to mess around with Photoshop for different effects. And, stick it to the man! Check out the images below for more information.
- Create a new document the size you want to print. I just chose the default U.S. Paper Letter which is 8.5 × 11.
- Select the Gradient Tool. Then in the Gradient Tool menu select one of the patterns, I chose spectrum.
- With the Gradient Tool draw your first spectrum. You may want to experiment with different sizes and lengths especially if you are using 120 and 35mm films.
- Create a few more layers and draw more gradients. You can make them all the same size or try out a few different lengths. When done, flatten the image, this will help out in later steps.
- At this point you could print this out as one filter option. It may help to try printing these at different opacities to change the strength of the color in the final picture.
- In addition to a gradient you can turn this into solid colors by applying Posterize to this image. Image→Adjustments→Posterize. Play around with the level of Posterize—I used 2.
- One way to make the polka dots is to open up a new document the same size as the previous one. Then with the paint bucket tool just make the whole thing a gray color. You want to make a mid level gray, I found different shades make different dots, so you might want to play around with that too.
- Next, change this document to a bitmap. Image→Mode→Bitmap. You might have to change the image to an 8bit Grayscale first, then to a bitmap.
- When making a bitmap be sure to choose method→ Halftone. Then you can play around with the next screen but I chose Frequency 5, Angle 45, Shape Round.
- You should now have a page full of dots or something that looks close to dots. If not, try a different shade of gray or learn to love the Frankenstein’s monster you’ve now created. Now copy the whole page of dots and paste that whole page on top of your rainbow gradient image.
- Select everything that is not a dot by going to Select→Color Range. Then Select Shadows. This will select everything that is black on this Layer. You can now delete this dots layer.
- While the selection is still active go to the rainbow layer and hit delete. This should now leave you with a page of rainbow polka dots! YAY!
- Print this masterpiece out! Be sure to play around with different opacities, shapes, sizes and masks.


Now that you have a printed mask it’s time to cut those up and get them in your camera.
- I found that these work best Inside the camera. So open up your camera of choice (I used a Lubitel 166+ and a Sprocket Rocket) and then cut a rainbow pattern to fit right in front of where the film goes.

- Tape the filter in well! This is important, my first roll the filter came off halfway through and ended up getting sucked into the roll of film! Also be sure that the filter doesn’t interfere with any moving camera parts.


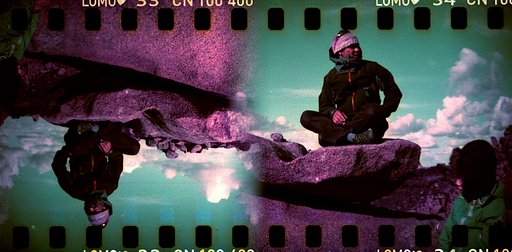
- Shoot! This might take a roll or two to experiment with. Try shooting different things, I found brighter days work best, and shots with plenty of sky in them really highlight the colors. Try bigger or smaller gradients, different patterns, different opacities and different films!
- Finally be sure to post your images on your lomo home and tag them with DIYFILTER (one word) so we can all search for them and see what amazing images you come up with!


geschrieben von sixsixty am 2012-07-09 in #Ausrüstung #Anleitungen #diy #rainbow #tutorial #filter #tipster #dots #polka-dots #handcraft #handicraft #select-type-of-tipster #select-what-this-tipster-is-about #diyfilter


61 Kommentare